
EnvelopeRecipientTabs Resource
The EnvelopeRecipientTabs resource provides methods that let you add, update, and delete tabs from an envelope. Tabs are associated with a specific recipient in an envelope and are only used by the recipient types In Person Signers and Signers.
On this page
- Tab Types
- Sign Here Tab Alignment
- View Tab
- Requesting Payments
- Using Custom Tabs in Envelopes and Templates
- Anchoring Tabs
- Automatically Populating Tabs
Tab Types
Some tabs enable values to be entered by the signer. Those tabs’ values can be preset either through the web browser or via the API. Other tab types use information that is already recognized by the DocuSign platform. These tabs cannot have their value updated on a per-tab basis by the API or via the browser. In some cases, the info might be settable using a different technique. For example, the Full name tab uses the signer’s name, which is set elsewhere in the request.
Here is the list of tabs and whether you can or cannot set their values in the tab definition:
[firstName]: https://developers.docusign.com/docs/esign-rest-api/v2/reference/Envelopes/EnvelopeRecipientTabs/create/#/definitions/firstName formulaTab: https://developers.docusign.com/docs/esign-rest-api/v2/reference/Envelopes/EnvelopeRecipientTabs/create/#/definitions/formulaTab [fullName]: https://developers.docusign.com/docs/esign-rest-api/v2/reference/Envelopes/EnvelopeRecipientTabs/create/#/definitions/fullName [initialHere]: https://developers.docusign.com/docs/esign-rest-api/v2/reference/Envelopes/EnvelopeRecipientTabs/create/#/definitions/initialHere [lastName]: https://developers.docusign.com/docs/esign-rest-api/v2/reference/Envelopes/EnvelopeRecipientTabs/create/#/definitions/lastName [list]: https://developers.docusign.com/docs/esign-rest-api/v2/reference/Envelopes/EnvelopeRecipientTabs/create/#/definitions/list [notarize]: https://developers.docusign.com/docs/esign-rest-api/v2/reference/Envelopes/EnvelopeRecipientTabs/create/#/definitions/notarize [note]: https://developers.docusign.com/docs/esign-rest-api/v2/reference/Envelopes/EnvelopeRecipientTabs/create/#/definitions/note [number]: https://developers.docusign.com/docs/esign-rest-api/v2/reference/Envelopes/EnvelopeRecipientTabs/create/#/definitions/number [radioGroup]: https://developers.docusign.com/docs/esign-rest-api/v2/reference/Envelopes/EnvelopeRecipientTabs/create/#/definitions/radioGroup [signerAttachment]: https://developers.docusign.com/docs/esign-rest-api/v2/reference/Envelopes/EnvelopeRecipientTabs/create/#/definitions/signerAttachment [signHere]: https://developers.docusign.com/docs/esign-rest-api/v2/reference/Envelopes/EnvelopeRecipientTabs/create/#/definitions/signHere [ssn]: https://developers.docusign.com/docs/esign-rest-api/v2/reference/Envelopes/EnvelopeRecipientTabs/create/#/definitions/ssn [text]: https://developers.docusign.com/docs/esign-rest-api/v2/reference/Envelopes/EnvelopeRecipientTabs/create/#/definitions/text [title]: https://developers.docusign.com/docs/esign-rest-api/v2/reference/Envelopes/EnvelopeRecipientTabs/create/#/definitions/title [view]: https://developers.docusign.com/docs/esign-rest-api/v2/reference/Envelopes/EnvelopeRecipientTabs/create/#/definitions/view [zip]: https://developers.docusign.com/docs/esign-rest-api/v2/reference/Envelopes/EnvelopeRecipientTabs/create/#/definitions/zip
Sign Here Tab Alignment
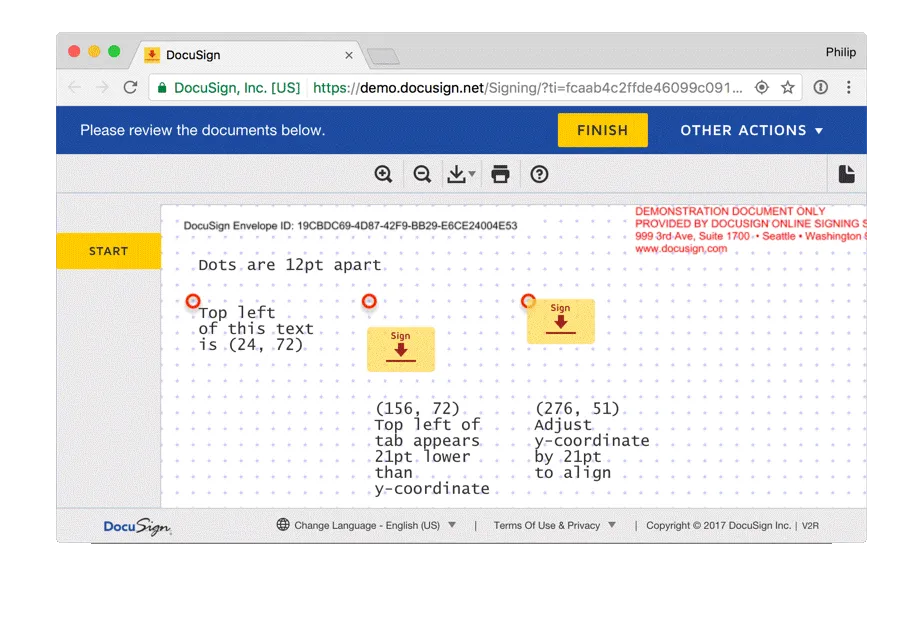
When you provide an x- and y-coordinate for the sign here tab, the tab appears 21 points lower than the value you provide for the y-coordinate. To align the tab as expected, subtract 21 from the expected y-value.
View Tab
The View tab is used on supplemental documents. To learn more about using the View tab with supplemental documents, see Using Supplemental Documents in the Sending Documents section of the Envelope: create method.
Requesting Payments
The Payments feature of the DocuSign eSignature REST API lets you collect payments along with signatures and other information.
To send a request for payment and collect payments, you need a payment gateway account, which is the destination for the payments. Create a payment account with a supported payment gateway, and then connect the payment gateway account to your DocuSign account. To learn how to connect a payment gateway account to your DocuSign account see Managing Payment Gateways in the DocuSign Support Center. You must connect and manage payment gateway accounts manually through the DocuSign Admin console and through your chosen payment gateway. There is no public API for connecting payment gateway accounts to DocuSign accounts or for managing payment gateway accounts.
Currently Stripe, Braintree, and Authorize.net are the supported payment gateways.
How Payments Work
To make a request for payment,
use a formulaTab
that has a
paymentDetails object.
This object includes
a list of paymentLineItem objects.
Each line item refers to a number tab
that contains the value of the each item.
The purpose of the line items
is to transmit them to the payment gateway
as metadata, so that you can use the information
in the payment processor.
Note: If the fileExtension parameter is not added in an API call, only base64 converted pdf files will be accepted. Any attempt to send a non pdf file without using fileExtension results in an error.
This is an example request for two books.
Each book is specified in the number tabs
labeled “Hamlet” and “Tempest”.
The books are referenced as line items
by their tab labels
within the paymentDetails object
of a formula tab.
The formula of the formula tab
add the values of the same two number tabs.
Use the
EnvelopeRecipients: list method
to check the status of a payment.
When the payment is successful,
the status property of
the paymentDetails object
is payment_complete.
Some Things to Keep in Mind About Payments
-
An envelope is not completed until all payments are completed.
-
If a DocuSign account Administrator deletes a payment gateway account connection DocuSign cancels all in-process envelopes that reference the deleted payment gateway account.
-
If the sender voids an envelope, all payment authorizations are canceled.
-
If a required recipient refuses to sign, all authorized payments are canceled.
-
If a required recipient’s payment fails authorization, DocuSign attempts to recover by sending the recipient notification about the failed payment authorization. The recipient has the opportunity to correct the payment method information.
-
Each recipient’s payment is authorized separately. Accounts are charged and payment made after all required tabs are completed, and all payments in an envelope for all recipients are authorized.
-
Refunds are not supported. Conduct refunds or payment changes with the payment gateway separately from DocuSign.
-
At this time, DocuSign does not charge a per-transaction fee.
Using Custom Tabs in Envelopes and Templates
Custom Tabs can be added to envelopes and templates
by setting the customTabId property
when creating an envelope or template recipient
or when adding a new tab for an existing recipient.
The custom tab must be added as the correct tab type.
For example if the custom tab type is text, it cannot be used as a number tab.
When the customTabId property is set,
the new tab inherits all the custom tab properties.
Required information that is not included in the custom tab,
such as document ID and page ID, must be included when adding the tab.
If the custom tab does not have anchor settings, the X and Y positions must be included.
After the tab is created, it is treated as any other tab for updating or deleting.
Anchoring Tabs
The tab anchoring option allows you to send documents for signature that do not have a fixed layout or format. In these documents you might not know the absolute location of the tabs when you design your API client application because the tabs must move with text. As an alternative to sending X and Y coordinates for tabs, the DocuSign Service can derive an anchor location for the tab by correlating anchor information to data within the document.
When the DocuSign Service receives a request that contains tabs
with anchor information,
it searches the document for instances of the anchorString property.
When found,
it places a tab of the specified type for the designated recipient.
Tab positions are established by setting offsets for the tab.
When you apply tabs to the document,
DocuSign does not remove or replace the text in the anchorString property. You can hide codified anchors by using the same font color as the background of the document. So the anchor can be used by DocuSign processes and it will not be visible on the document.
To use an anchoring option:
- Identify the location in the document by text string. You can use a pre-existing text string or add a new one. For best performance DocuSign recommends using single word anchor strings when possible, especially when there are a large number of pages in the envelope. For example, you might want to add a Sign Here tab to the “Borrower’s Signature” lines in a document, but that phrase might occur in places in the document where you don’t want to tab to appear. In this case, you could add the text “BorrowerSignHere” in white font color (so that isn’t visible in the document) to all the places you want Sign Here tabs to appear and use “BorrowerSignHere” as the anchor string.
- Reference the anchor through the
anchorStringproperty of the tab. - Determine the offset from the anchor string location to where the tab should be placed.
Setting a positive value in the anchorXOffset property moves the tab right on the page and positive values in the anchorYoffset prove moves the tab down the page. The anchorUnits property specifies the units used for the offsets.
For Sign Here and Initial Here tabs the bottom-left of the anchor string is equivalent to position (0,0), and the bottom-left of the tab graphic is placed relative to that.
For all other tabs the bottom-left of the anchor string is equivalent to position (0,0), and the top-left of the tab graphic is placed relative to that.
DocuSign does not currently provide tools to derive the offset values. Determination of the proper offset will likely require some trial-and-error.
Rules for working with anchor tags
When anchor tabs are used, all documents in the envelope are searched for the anchorString property.
- You set the text of the anchor string in the
anchorStringproperty. DocuSign tabs are created for each instance of theanchorStringproperty within the document, so special care must be taken to establish unique anchor strings that do not result in unintentional tabs. - You cannot use the same anchored tab for different recipients for the same document.
- The DocuSign system cannot search for text that is embedded in an image when checking for anchor strings.
- X or Y offsets supplied for a tab apply to all instances of the tab in the document. To use different offsets at different locations in the document for the same recipient, create multiple, unique anchor tabs.
- If the Y offset value of an anchor string would force a tab outside of the page boundaries, the tag is placed at the page boundary. If the X offset value places a tab outside of the page boundaries, the error message
Invalid_User_Offsetis sent. The error message includes the X offset that resulted in the error. - The system does not support an anchor string embedded in the form of a PDF X-object in the document.
- The system does not re-flow the text that surrounds the anchor tabs. It is the responsibility of the document author to provide sufficient white space to contain the potential width of the ultimate tab value.
Tips and Tricks
The following are tips for effective use of anchor tags:
- In order to avoid unintentional conflicts between text contained in an
anchorStringproperty and the text that naturally exists in documents, establish a codified syntax for the anchor string text that is unlikely to appear elsewhere in a document. - Develop an extensible and consistent syntax that can be used across multiple document types.
- Especially for documents that have variable numbers of tabs or signers, author the source document to include hidden anchor tabs for all potential signers/permutations. Then, control the tabs that are actually placed by including/excluding the anchor tabs in the request. This approach allows a single document to be used for all use cases instead of maintaining separate documents for each scenario.
Automatically Populating Tabs
If you want similar tab types to automatically populate with the same data, you must follow these guidelines:
- Each
tabLabelentry must have the characters\\*in front of the label. If you omit the\\*prefix, only the first occurrence of the tab is populated.
When automatically populating tabs,
the tabLabel must not contain any spaces.
In the JSON example below,
the Text tabs properties StudentLastName and StudentFirstName
will be auto-populated as specified (“Doe” and “John”)
each place they appear throughout the envelope.
- Each occurrence of the tab must have identical properties.
For example, suppose there are two Text tabs in a document,
each with tabLabel set to Name.
If one tab has the bold property set to true,
and the other has the bold property set to false,
only the first one will be populated.
In order to automatically populate both occurrences
of the Name Text tabs,
the bold property must be set to the same value for both tabs.