
Standards-based signatures
Standards-based signatures
Docusign enables document signers to use electronic or digital signatures of the following types within a single envelope by using standards-based signatures (SBS):
- Electronic signatures
- Advanced Electric Signature (AES) using certificates from Docusign or from your organization
- Qualified Electronic Signature (QES) from government-certified Qualified Trust Service Providers (QTSPs)
Add a digital signature in your envelope
To use a digital signature in your envelope:
-
Determine the signature providers that your signers will use from the signature provider options list. See Use Digital Certificate-Based Signatures for More Secure Agreements for a list of additional TSPs that are available.
-
Include a value for the
recipientSignatureProvidersparameter for at least one signer defined in your Envelopes:create method call. This parameter specifies the digital signature provider(s) available for the recipient to use, and any options associated with the provider(s).The definition of the
recipientSignatureProvidersobject is:
The associated example shows two EU AES recipients. One uses SMS authentication, the other uses a one-time password (OTP) for authentication.
AES signatures
Advanced electronic signatures require signers to use digital certificates to verify their identity. When a signer receives the envelope to sign, the sender can specify if they would like for the signer to sign using an AES certificate from Docusign or by using a certificate owned by the signer, such as a smart card. The signer will receive the envelope and sign as normal while having the certificate applied in the sender’s desired form.
QES signatures
QES signatures use a government-authorized entity known as a Qualified Trust Service Provider (QTSP) to:
- verify the identity of the signer, either face-to-face or through a video chat, with a valid identification document
- validate the identity of the signer at the time of signature through signer-held or cloud-based certificates
Provisioning QES Signatures for your account
To enable QES Signatures for your developer account, contact Docusign Support. To enable it for your production account, contact Sales.
Send an envelope with a QES
To create an envelope that includes a qualified electronic signature, you must provide the following additional values in your envelope definition:
recipientSignatureProviders: The parent object required to define the electronic signature parameters.signatureProviderName: The name of the electronic signature provider for the signer to use. For details, see the signature provider options or list the types available on your account by using the AccountSignatureProviders:list method.
The associated example JSON envelope definition demonstrates the data required for adding a QES. It uses IDNow, an identity verification service that uses the signer’s webcam and microphone to verify their identity. If you would like to use this code along with one of the Docusign SDKs, you can use our JSON to SDK tool to transform the call into C#, Java, Node.js, PHP, Python, Ruby, or VB.NET.
IDV for EU Qualified Electronic Signatures
You can also use EU Qualified Electronic Signature with ID verification (IDV) to verify the identity of an envelope recipient, instead of or in addition to other types of IDV. This method of generating qualified electronic signatures uses IDV to verify the recipient’s identity and complies with the European eIDAS (electronic Identification, Authentication and Trust Services) regulation.
This eIDAS regulation requires an equivalent of face-to-face identity verification for signers to issue qualified signatures; Docusign uses a certified remote identification provider to comply with these requirements. The provider offers a self-serve identification process, meaning signers can complete the process without interacting with a live agent. A back-office agent will review the transaction afterward, typically within 3–5 minutes. See Verification of Government-Issued IDs for European Qualified Signatures for details.
To use EU QES for IDV:
- Your plan needs to support IDV For QES.
- You must have an admin account to register an account and create a custom Connect event.
Docusign provides a default EU QES for IDV configuration by default, or you can create your own in eSignature Admin by opening the Identity Verification page, selecting Add Verification at the upper right of the screen, then choosing Docusign ID Verification for EU Qualified and checking your desired verification options. See Add Identity Verification for EU Qualified Electronic Signatures for details.
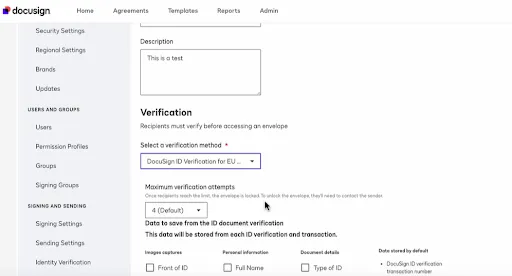
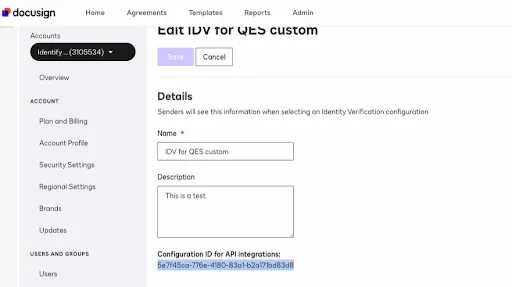
When creating your envelope, you can use IDV for EU QES by specifying a workflowId value for one of your defined EU QES for IDV workflows. You can find the workflowId for a workflow by opening the Identity Verification page, scrolling to find your IDV for EU QES workflow in the list, then selecting Edit, or by calling the IdentityVerifications:list API endpoint. The Configuration ID for API integrations is the workflowId that you can use to implement the workflow for your envelopes.
A default IDV for EU QES workflow is provided with the feature. You can use this workflow as an example implementation and the basis for creating your own IDV for EU QES workflows. The ID of this default workflow is 5eedeb39-c6a2-48d9-b789-b5459c2ff9bb.
After the envelope and recipient view have been created, the IDV for EU QES workflow begins. The recipient performs ID checks, including ID capture, facial recognition, and liveness tests. When the recipient finishes all of their challenges, Docusign sends an identity-verification-pending Connect message. At this point the signer must wait until the final review is completed.
When the ID is verified, Docusign sends an identity-verification-completed Connect message indicating that validation is completed. If the verification was successful, then your app can create the recipient view and show agreement documents or, if unsuccessful, retry.
Testing digital signatures
Standards-based signatures are not included with default developer accounts. To test with standards-based signatures, ask your Docusign technical contact, or Docusign Customer Service, to add the SBS feature to your account. To test with a TSP, you will also need a test account from them. Discuss your needs with your Docusign Account Manager.
Note: By design, digital signatures created in your developer account will verify with warnings that the signer’s identity cannot be trusted. Digital signatures created on Docusign production systems will not have this issue. See the Standards-based signatures support page for details.
Listing an account’s signature providers
You can list your account’s enabled signature providers using the AccountSignatureProviders:list method. Using this method is optional; you can also hardcode signature provider names.
Signature provider options
Electronic signature
Electronic signatures do not use digital certificates. These are the default type of signatures from Docusign.
- API signatureProviderName:
UniversalSignaturePen_ImageOnly - Required options: none
Email signature
Docusign-generated generic, “on-the-fly” digital signatures that include a certificate.
- API signatureProviderName:
ds_email - Required options: none
Email signature for FAA compliant customers
A version of the standard ds_email signature provider that is compliant with FAA regulations. Use this variant instead of ds_email if your digitally signed documents must be FAA compliant.
You can contact Developer support to enable ds_email_shield for your account, if required for your business.
- API signatureProviderName: ds_email_shield
- Required options: none
EU Advanced signature
Docusign-generated, eIDAS AES compliant signatures. See the Standards-based signatures support page for details.
- API signatureProviderName:
UniversalSignaturePen_OpenTrust_Hash_TSP - Required options: SMS or one-time password
Note: If you are using Docusign EU Advanced signatures and embedded signing, in the event the recipient fails the Access Code or SMS OTP when the digital signature is applied, you are redirected to the ReturnURL with the query parameter
?event=access_code_failed.
- Limitation: The recipient name must not contain the following characters: ^ : \ @ + < >
ICP-Brasil
ICP-Brasil is the official Brazilian public key infrastructure. It provides digital certificates for virtual identification of Brazilian citizens. Find more information at Brazil’s National Institute for Information Technology website.
- API signatureProviderName:
UniversalSignaturePen_ICP_SmartCard_TSP - Required options: none
IDnow
EU Qualified electronic signatures from IDNow. IDnow is a leading European online video-identification service based in Germany.
- API signatureProviderName:
docusign_eu_qualified_idnow_tsp - Required options: none
itAgile
Qualified electronic signatures using itAgile EU Qualified Certificates.
- API signatureProviderName:
UniversalSignaturePen_ItAgile_TSP - Required options: none
US PIV Card
The US Federal government specifies Personal Identity Verification (PIV) smart card requirements for Federal employees and contractors. This provider enables PIV card holders to digitally sign documents.
- API production signatureProviderName:
UniversalSignaturePen_PIV_SmartCard_TSP - API test signatureProviderName:
UniversalSignaturePen_PIV_Test_TSP - Required options: none