
SOAP API Overview
This page describes functionality for the older eSignature SOAP API. See eSignature REST API 101 overview for more information on this topic in the more actively-supported eSignature REST API documentation.
The SOAP Developer’s Guide provides information about the Docusign® SOAP Service API and Account Management Service API.
This guide also includes information on Docusign security requirements and API call limits, authentication, and using Web Services Description Language (WSDL) to implement the API.
Get started
Follow these steps to add document signing to your SOAP application in minutes. This guide demonstrates the embedded signing which is a common SOAP API workflow. In order to embed the signing process into your application you’ll need to create and send an envelope, which is core to Docusign transactions.
Sign up for a free developer account
Sign up for a free developer account
Developer accounts are free, they don’t expire, and they let you test most of our features in the demo environment. Documents sent in the demo environment are not legally binding and have watermarks on them indicating they are tests.
Create an integration key
Create an integration key
To generate an integration key, log in to your Developer Account and select Settings from the top menu. eSignature Admin opens.
On the lower left side of eSignature Admin, select Apps and Keys, then click the Add App / Integration Key button:
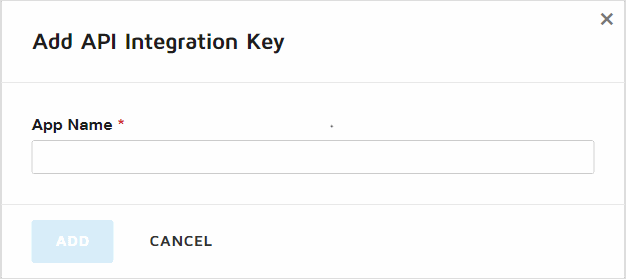
Enter a name and click ADD to create a new integration key. Note: this same value is used as your client_id during the OAuth authorization flow.
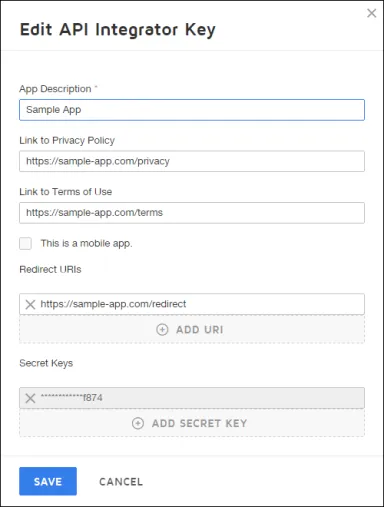
On the following screen you can configure specific OAuth settings for your key. Docusign offers multiple forms of OAuth authentication including the Authorization Code Grant, Implicit Grant, and JSON Web Token (JWT). For this quickstart we will use the Authorization Code Grant method.
Click the ADD URI button to configure at least one redirect URI for your key, which is case-sensitive. Use the ADD SECRET KEY to create a secret key and copy it to a secure and easy to access location since you will use it in the code below.
Choose SOAP authentication method
Choose SOAP authentication method
The Docusign platform offers two ways to authenticate your SOAP API requests:
- SOAP Header via WS-Security UsernameToken
- HTTP Header via a custom field
X-Docusign-Authentication
The Docusign global platform supports two different SOAP API endpoints:
https://demo.docusign.net/api/3.0/api.asmxhttps://demo.docusign.net/api/3.0/dsapi.asmx
To use the WS-Security UsernameToken authentication method point your code to the api.asmx endpoint. Integrations using the X-Docusign-Authentication header must use the dsapi.asmx endpoint. For more information see the SOAP authentication guide.
Create a signature request
Create a signature request
The next step is to create a signature request which is equivalent to creating and sending an envelope. In this example we use the CreateAndSendEnvelope() method to accomplish this. Note that since we want generate a signing link we must set the recipient’s CaptiveInfo node and more specifically the ClientUserId property (which takes a string). By setting this property we designate the recipient as an embedded signer which then allows us to generate a custom signing link for them in the next and last step.
Whatever value you set for the ClientUserId you must remember for the next and final step, where we generate the recipient view (ie signing URI) of the envelope.
Since we set the status property to sent the envelope is active and ready to be signed, the next step is to create the recipient view of the envelope.
Sign the document
Sign the document
The last step is to generate a signing link (URL) that you can redirect to sign your document(s). For desktop and laptop browser integrations we recommend you redirect and let Docusign take full control of the browser window. Framing is fine, but make sure to handle sizing of the frame and give maximum screen space.
To generate the signing link - also called the Envelope Recipient View - use the RequestRecipientToken() API. You’ll need to provide the same name, email, and clientUserId you supplied for the recipient in the create envelope API.
We also must provide two values to generate the signing view- a returnUrland an authenticationMethod, which both take strings. The returnUrl is where the signer will be redirected to once they are done signing. The authenticationMethod is an enumerated value used to help identify how the recipient authenticated through your integration. Additionally, the authenticationMethod goes into the envelope’s Certificate of Completion (CoC) - a PDF that is automatically generated for every envelope - once the signing is complete.
The response contains the custom signing URI you can use to sign the document. Note that signing tokens are one-time use only and expire after 5 minutes:
https://demo.docusign.net/Signing/startinsession.aspx?t=fd6b9e60-xxxx-xxxx-xxxx-1f4d2e1973d1&pei=d1cf4bea-xxxx-xxxx-xxxx-746678e3679f
Open the link in a browser window to begin the signing process.
Once signing is complete and the signer is redirected to the returnUrl you specified in this request. The return URL will have a query parameter appended to it which indicates the action the recipient took. For instance, if the your return URL is https://www.docusign.com and the recipient signed the document the query parameter would look like:
https://www.docusign.com?event=signing_complete
Your code can then parse the query parameter’s value and take the appropriate action based on what the recipient did.
Congratulations, you’ve just signed a document through the most secure and most trusted eSignature API on the planet!