
ISV Connector Implementation Plan
An ISV connector is a partner that allows Docusign users to connect their accounts to the partner app.
This is relevant when:
- Your company’s business app will connect using its customer’s Docusign account
- You want to only integrate with Docusign eSignature and let your customers buy from Docusign
- You already have customers using Docusign
If the above does not meet your use cases or business needs, try our Integration Guide Selector.
Step 1. Set up your account
Set up your account and familiarize yourself with the Docusign platform.
A. Create a free developer account and integration keys
To create an account, select Developer Account at the top of this page or any other Developer Center page, then choose Create Account. You can also use the button below.
Create accountA Docusign developer account (sometimes referred to as a demo account) enables you to develop and test your app in the developer environment (sometimes referred to as the demo environment), which is isolated from the production environment. It’s also referred to as the demo environment or a demo account, and was previously known as the developer sandbox.
Developer accounts:
- Do not expire
- Do not incur subscription costs
- Can be enabled with full Enterprise Features (with a few exceptions)
You can create and work with any number of API integrations within your developer account. Each API integration (also known as a connector) is identified by an integration key (IK).
To set up your integration, you will need to collect some of the customer’s Docusign account information. An administrator for the account can find these on the Apps and Keys page of Settings:
Your integration key is also configured with values used for OAuth 2.0 authentication:
- Either a secret key or RSA key pair, depending on the OAuth flow used
- A redirect URI that is used when obtaining consent and during some initial authentication steps
B. Review Platform 101 concepts
Review the key concepts and objects used on the Docusign eSignature platform, including:
Step 2. Review and choose the authentication method
Most Docusign APIs are sessionless and require an access token for each call. You can obtain an access token using one of the supported OAuth flows. Currently, there are three OAuth flows available: JWT Grant, Authorization Code Grant, and Implicit Grant. Note that all new integrations MUST use an OAuth flow.
For details on ISV OAuth options and considerations, see:
If you are using JWT grant, make sure that you follow the ISV best practices listed on JWT Grant implementation and best practices.
Step 3. Envelope creation and sending strategy
A. Learn and adopt the sending strategy
Basic envelope setup requirements
The Docusign eSignature API offers three primary models for envelope creation. As a partner, you should use the composite template option that is appropriate for your one to many style integration. You can read more about composite templates in Step B.
- From a composite template, which allows for a combination of documents and templates
- With Documents, Recipients, and Tabs.
- From a template.
Tab placement strategyYou can add documents to an envelope directly or by using a Docusign template. If your integration adds documents directly from your application, you have a few ways of assigning tabs to envelope recipients.
- Auto-place (anchor tagging)
- Account-level/server-side anchor tagging
- Fixed positioning
- PDF form field transformation
If you do not implement one of our tagging strategies, you should include our Sender View as part of your envelope creation and sending workflow. Failing to assign tags in your envelope, will result in a rejection during your Application Review prior to go-live.
Guidance on recipientsEvery envelope must have one or more recipients.
When working with recipients:
- Do not use the email address as the value for your recipient’s name.
Also, review each of the defined recipient types. Ignore the In Person type. If you have a reason for an In Person scenario, switch to Embedded signing instead.
Not all recipient types are available to all customers If you still have questions, check with Partner support to further understand which features/recipients are available in which commercial plans and subscriptions to determine exactly what you need in order to accommodate your workflows and use cases.
Recipient use case considerations When working with recipients, consider how you will address the following:
- Localization support: While signers can toggle the language used in the signing UI, the sender can influence the language used by default, as well as change the language used in the email, on a per-recipient basis. See emailNotification for details.
- Recipient authentication: If your use case or customers are in regulated industries, we strongly recommend adding additional recipient authentication options such as ID verification, phone authentication, or knowledge-based authentication.
- Docusign Standards-Based Signatures: If your signers are in regions that require a digital signature.
- Signing Group: You should give strong consideration to supporting this.
- Supplemental documents: If the use cases supported by your business application include sending supplementary or informational documents such as terms & conditions, disclosures, or non-actionable documents.
Sender view or Direct Send via API
You should take all possible customer scenarios into consideration when building your app. The more you can do for your users, the more value it provides.
-
Sender View: The Docusign Sender View (also called Embedded Sending) is the most flexible way to incorporate most use cases. Your app can pass the sender directly to the Docusign Sender View, enabling them to use all of their sending features and to manipulate draft envelopes without having to code everything into the partner app’s envelope call.
See EnvelopeViews:createSender for details and a link to a demo tool that helps you preview and customize the sender view.
Important: Do not use an iframe for Sender View operations.
- Some Docusign features are not supported in iframes.
- Browser vendors have announced their plans to phase out third-party cookies, which could impact the ability to use the Sender View in an iframe.
Instead of using an iframe, the best practice is to display the Sender View in a new browser tab. For iOS devices, Docusign recommends using a WkWebView.
-
Direct Send via API: You can create and send envelopes directly from your application without going through the Docusign Sender view. All the necessary data and documents are provided by the partner application, the envelope is created via the API, and the status is set to
sent.Pro Tip: If you are building the Direct Send via API model, consider also including the Sender View option as an optional envelope edit scenario.
B. Build around the Composite template model
Composite templates are the most flexible and extensible of the ways that Docusign enables you to create envelopes. Building around the composite template model prevents having to do more work later in response to changing conditions and requirements.
For details on composite templates and how to use them, see the following resources.
- Composite templates
- How to request a signature using a composite template
- Why You Should Be Using the Composite Template Model
- Pro tips for working with composite templates, Part I
- Pro tips for working with composite templates, Part II
- Pro tips for working with composite templates, Part III
- From the Trenches: Composite templates
- Composite Templates: Custom Forms with Shared Signature Document in the MyAPICalls sample app
C. Must-have features
Your settings for creating envelopes determine what your users’ signing experience will be. Consider implementing the following features into your envelope creation workflow.
- Templates: One of Docusign’s most beloved and important features. While you may think at first that you’re not going to use templates, Docusign customers (especially if they are long time customers) frequently request them. Remember to include a roleName for your templates; it may look optional, but it’s important to add.
- Responsive signing: Can greatly improve your signing experience. When using responsive signing, remember that the document is a responsive signable HTML document.
- Auto Navigation: Can guide signers through the signing process.
- Consider allowing Signer reassign.
- Consider allowing Comments, unless you are using embedded signing. Comments facilitate collaboration between senders and signers, creating more successful transactions.
- Consider implementing access code authentication. Docusign offers many ways to authenticate a signer; access code is the only free type of recipient authentication. Save your team some time and include access code as an option.
Step 4. Envelope signing
Depending on how your signers will sign documents, you should use either remote or embedded signing.
A. Remote versus in-app embedded signing
Choose to use either remote signing or embedded signing. Where will your signers view and sign documents?
- If your signers are present and ready to sign immediately in the presence of your application, your integration can use embedded signing to have them sign directly within your workflow.
- Otherwise, you can use the default mode of remote signing, where the signer receives envelope notifications asynchronously from Docusign via email, SMS, or WhatsApp.
If your recipients are signing remotely, email is the default delivery mechanism. You should also consider supporting SMS delivery or WhatsApp.
Note: Envelopes can have a mix of embedded and remote signers if your workflow requires it.
B. Best practices for implementing embedded signing
For in-app signing, see the embedded signing overview.
Guidelines for embedded signing:
- In embedded signing, your integration’s app controls signer access. Because Docusign is not generating and sending email notifications with a unique link, Docusign is not validating that your specified recipient (name and email) has access to the email address. This means that it is your responsibility to provide some means of identifying the correct recipient for an envelope.
- In addition to your application’s authentication process, you can use Docusign authentication services via an embedded signing ceremony. For example, ask Docusign to request a pre-shared secret (an access code), or to send a code via SMS to the signer. Note that not all Docusign authentication options are available on all types of embedded signing ceremonies.
- You can record integration application authentication into the envelope record using the
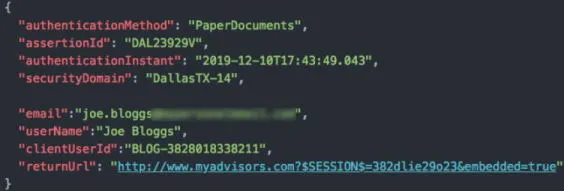
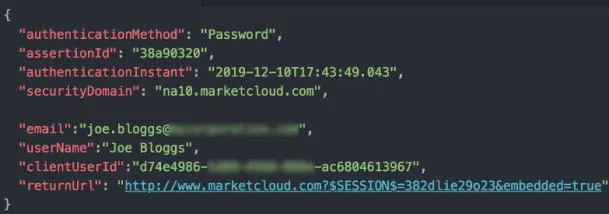
authenticationMethod,authenticationInstant,assertionId, andsecurityDomainproperties. The provided values will be included in the envelope record and on the envelope’s Certificate of Completion, connecting integration application user authentication with the Docusign embedded signing session. authenticationMethod: Specifies how your app authenticated the embedded signing user. The value must be one of an enumerated value list of strings. This is a required element.authenticationInstant: Holds the date/time instant when the user was authenticated by the integration application. This is distinct from and should occur earlier than when the signing view methods are invoked.assertionId: Provides additional data for retrieving original authentication information.securityDomain: Specifies a location for authentication. This can be a URL, a subdomain, an office ID, a kiosk ID, or other identifier.
Important: Due to potential problems fitting an iframe into limited screen space, do not use iframes for embedded signing with the classic signing ceremony on mobile devices. Instead, use a new browser tab, a WkWebView for iOS devices, or a WebView for Android devices. The new Focused View signing ceremony can be used with a limited amount of GUI chrome provided by your application.
Example application authentication records
- This record holds data for an in-office visit where the signer’s identity was authenticated via their driver license, the time the ID was entered into the app by an advisor, and includes an office identifier.
- This record holds data for an online user login, specifying an authentication log archive ID, date-time instant, and sub-domain for archive lookup.
These four elements enable you to verify the signer entry, indicate how authentication took place, and record details for auditing.
Step 5. Envelope notifications
See recommendations and best practices around getting status notifications.
A. Get envelope notifications using webhooks
If your integration needs to act or display status as your envelopes are viewed, signed, and completed, set up a Webhooks listener to receive updates when these events occur. To support all Docusign account types (including customer plans purchased from the website), use envelope-level webhooks and our Connect 2.0 event model.
For Docusign Connect, use the JSON SIM event model. Unlike messages in the previous supported formats, the JSON SIM message format is event-focused rather than envelope-focused. This means that:
- By default, rather than getting a summary of the envelope in each message, the message contains data about the triggering event. This means that each message is much smaller, more focused on the data you request, more customizable, and easier to process. Depending on the event type, you may choose to include the envelope summary as well.
- You can track and subscribe to more types of events.
As a security best practice, partners with one main account who must manage multiple client connect accounts, should configure your client accounts to be integrator managed, enabling you to use your main account’s OAuth for Connect settings for each client. This lets you configure and enforce using OAuth security for each client Connect account without having to set up each one manually. See Managing OAuth credentials for multiple accounts for details.
B. In-flight transaction controls
Once an envelope has been sent to your signer(s), your integration users should be able to continue to monitor and manage it through your app. Common scenarios include:
- Providing envelope status and progress
- Alerting to errors (rejected email address, signer failed recipient authentication, and more)
- A way to cancel a sent envelope (API)
- A way to correct a sent envelope (recipient name/email and other properties via API)
- Automated retrieval of envelope documents
For some of these events, you can use the Connect service to notify your app. Connect provides timely status notifications for your envelopes, triggered by recipient and envelope events.
- While polling via API can be used within limits, using the Connect service rather than consuming API calls is the best practice.
- For ISV integrations, you should use the
eventNotificationelement to register for Connect directly rather than use an account-level configuration.
Best practices for envelope status notifications
- Get recipient/envelope status: Employ the Connect notification service to receive timely updates on envelope progress.
- Recipient issues (invalid email address, failed access): Use the Recipient Delivery Failed and Recipient Authentication Failure triggering event options in Connect.
- Void: Envelopes may need to be voided for a number of reasons. You can void envelopes with the Envelopes:update API method. If possible, correct or update the envelope rather than void it; this will save on envelope usage and reduce potential costs for your customers.
- Correct: If there is an error in a sent envelope, you can correct rather than void it. An integration can offer various forms of correction. A simple correction, such as changing an email address, resetting recipient authentication, or changing expiration and reminder frequency, can be done via a simple Envelopes:updateNotificationSettings API call. For more complex corrections, you can use the Correction view. If you choose to perform a complex correction directly via the API, you may want to obtain an envelope lock before making your API calls, then release it when you’re done.
See Envelopes:update for more information.
C. Completed transaction controls
Your integration should be able to manage transaction records to retrieve or purge documents.
- Document Retrieval: Simply sending documents for signature is rarely sufficient for real-world apps. In most cases, you should return the completed documents (and perhaps the Certificate of Completion) to the integrated application. This improves your integrated app’s ease of use and reinforces it as the system of record. Your integrated application can use the Connect service to be notified about the final status of an envelope and use the API to retrieve the documents in your desired form (combined contiguous PDF, individual documents, or selective single documents). Note: You should consider retrieving the Certificate of Completion in cases where the envelope was
voidedordeclined, as well ascompleted. See EnvelopeDocuments:get for details on retrieving documents. - Purge: Depending on your location and requirements, your app may need to be able to purge records to support GDPR regulations or legal rights to be forgotten.
Step 6. Digital Referral
Digital Referral enables your app to offer users an opportunity to experience your integration for free. This is available for your customers who are not currently using Docusign. The Digital Referral workflow provisions the user with a free Docusign trial account. This will enable them to configure your connector and try out our products together. If they upgrade to a paid plan per the terms, you will earn a referral fee. This supplements or replaces the manual referral submission process through the Partner Portal.
You must be participating in the Docusign partner program to be eligible. Digital Referral is also an eligibility prerequisite for the ISV app review and a free integration key management account in the production environment.
A. Workflow
Digital Referral provides JavaScript functions to power a Start Free Trial button and a View Plans button. A user who does not have a Docusign account but wishes to get one to try out the integration can complete the following:
- The user clicks your Start Free Trial button, which starts a free trial provisioning workflow.
- A popup form collects essential user information, which will then be used to provision an account.
- The user is prompted to enter a security code passed to them via email.
- The user is asked to set up a password.
- The user is returned to your app in a logged-in state, ready to complete the consent flow of your integration’s Docusign OAuth 2.0 step.
The other primary function powers a View Plans button that shows a Docusign view of purchasable eSignature plans, including a contact option to negotiate and buy more complex solutions directly from a Docusign sales representative. This should be placed where the user will see it after they have completed the Start Free Trial flow.
B. Setup requirements
Digital Referral is currently only available for eSignature REST API integrations using OAuth 2.0. Furthermore, you must participate in the Docusign Partner Program. To set up Digital Referral:
- Go to https://www.docusign.com/partners.
- If you have not signed a Master Partner Agreement with Docusign, choose Become a Partner and click Apply Today. You’ll need to complete the partner signup process before continuing with this procedure.
- If you are an existing partner, choose Partner Login and log into the Partner Portal.
- Under Support, choose Partner Program Support and submit a ticket requesting Digital Referral signup.
As part of the signup process, Docusign will enable your integration key for Digital Referral. The integration key will be used as your Digital Referral identity.
You will need to add a redirect URI to your integration key for Digital Referral. This URI will need to be passed as the loginRedirectUri parameter value.
For implementation details, see the Digital Referral function specifications.
C. Add buttons
Digital Referral provides functions to drive two buttons: one to launch the trial account signup and provisioning workflow, and another to show the plans for purchasing. To see a sample integration, view the Business Sample App and its source code.
The Start Free Trial button should be positioned where the administrative user would normally configure the connection to their Docusign account. You can label the button in a way that is appropriate to your integration app; for example, by providing a textual call to action such as “I need a Docusign account to try the integration” and a button labeled Get Docusign for Free or Free Trial. The button action handler should then call the DSDigitalSignup.startSignup function, passing the required parameters and any optional parameters available. See Digital Referral: Trial sign-ups for integrated partner apps for details. Because there is no test mode, testing should only go so far as to start the signup workflow. The test user can verify that the signup form was presented and that any optional parameters resulted in pre-filled form fields. At this point, the test user should cancel the signup. This has sufficiently proven that the Digital Referral function was invoked correctly.
The View Plans button is optional and should ideally be placed where the user can see it after having completed the free trial provisioning process (while in a logged-in state).